Quasar Scan user guide
Windows Agent Deployment
Mass Deployment
For mass-scanning of desktop machine or server hard drives, it can be ‘baked into’ the desktop build, or mass deployed using SCCM, GPO, or similar technologies.
Quasar has no external dependencies apart from the standard Microsoft runtime library. See ‘Installers’ below for more information on this. SCCM is the most common installation method.
You only need to ensure that the server IP / hostname is configured. The Agent installer includes command line parameters which will assist with SCCM deployments.
Remote Installation (Windows)
The recommended type of installation is a remote installation via SCCM or other suitable deployment technology.
The Agent installer features commandline parameters to assist with this process.
A typical scripted install will follow the steps below:
Step 1
SetupQuasarV4xxAgent.exe /S /Server=111.222.333.444 /D=C:pathtoinstall| Command | Configuration |
|---|---|
| /S | Silent install – do not display installer UI or prompt dialogs. |
| /Server | Server IP address. If this is specified, the installer will overwrite the 127.0.0.1 (the default) in local.cfg with the IP address given on the command line as a final step after files are installed. |
| /D | Directory / folder to install the agent files into. |
Step 2
Once the installer has completed, SCCM or similar can be scripted to run the following command:
quasarscan.exe --startup auto installOptionally, other changes to local.cfg (log levels, etc) should be made at this point.
Any required changes to the Quasar Agent Windows Service configuration (e.g., service user accounts if applicable) should be made at this point also.
Finally, the SCCM may be scripted to actually start the service.
Manual Installation Instructions
Windows Installation
1. Install Quasar Agent
Obtain the most recent version of the software from the Quasar Specialist you are working with. Install the SetupQuasarV###.exe file where ### represents the version number. Your Quasar specialist will will provide you with the most recent version of the file. Follow the on-screen prompts to complete the installation of the Quasar Agent package.
The default installation path is
c:quasarquasaragent
2. Configure the Quasar Agent
You will need to configure the Quasar Agent so that it is able to connect to the Quasar Server. Navigate to the path where you installed the Quasar Agent and open the file local.cfg in a text editor.
Ensure that the server address is set to either the DNS name or the IP address of your Quasar Server, otherwise connectivity will fail.
{
    \"agent\" : {
        \"server\" : \"127.0.0.1\"
    },
...
}
3. Install the Quasar Agent Service
Open a command prompt as an administrator. Go to the path where you installed the Quasar Agent, then complete the installation of the Quasar Agent Service:
cd c:quasaragent
quasarscan.exe install
4. Configure the Service
Open Services (services.msc) as an Administrator and go to the Quasar Scanner Service. Right click on the service and select properties.
Verify that “Start Up” is configured to “Automatic”.
If the Service is not started, click the “Start” button before clicking “OK”

5. Check that the Agent is Visible in the UI
On the Quasar Server UI, refresh the page to confirm that the Quasar Agent shows up in the list of Agents. If it does not show up, there may be connectivity problems. Ensure that you have configured the Quasar Server information correctly in local.cfg and that the relevant network ports are open.
6. Check Connectivity (If the Agent Does Not Show Up)
If the agent does not show up in the list of agents, run a comms test.
- Run the following command:
quasarscan.exe commtest - The agent will attempt to connect to the server and send a ping message. If a ping message is received, the agent output will look like the following:
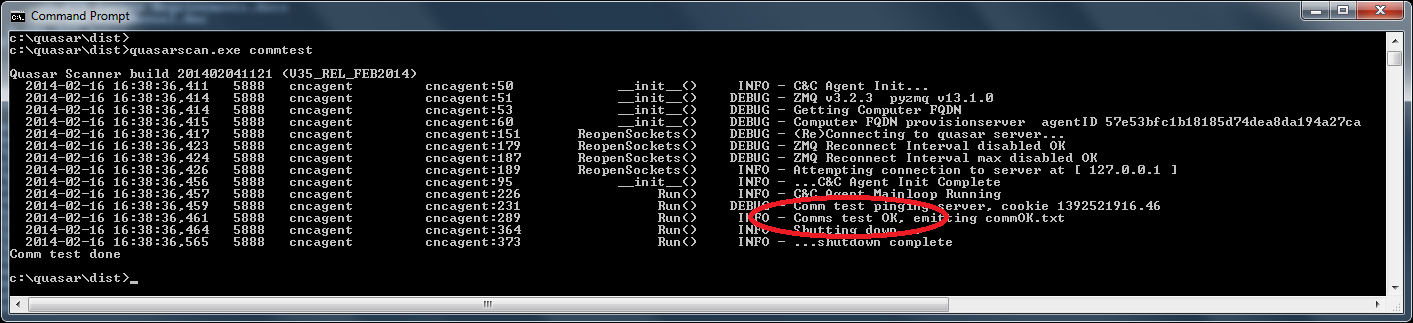
- If connectivity fails, the foregrounded agent will wait forever. Halt it with Ctrl+C If connectivity fails, ensure TCP ports 55555, 55557 and 55559 are open through to the quasar server’s host machine. (Quasar V3 and V4 – current)
- On some Windows versions, you may need to close and reopen the command prompt terminal window.
Installers (Windows)
The Quasar agent has no additional dependencies except for the standard Microsoft VC runtime library, which is already present as part of modern Windows installs.
There are two editions of Agent installer:
- The standard edition, which includes the Microsoft VC runtime files. Best used when you have older Windows machines, or when you want to be sure the agent will run with no problems. This edition is fully supported.
- The ‘no-VC’ edition, which does not include the VC runtime files. Best used when you have modern Windows machines, where the VC runtimes are already installed. This edition may be supported depending on your agreement.
Example agent installer downloads:
