Quasar Scan user guide
Creating Jobs and Viewing Scans
To create a new job, click the New Job button in the Jobs tab.
NOTE: New jobs inherit the settings from the master settings, but these can be changed on a per-job basis.
Creating a New Job
When you create a new job, you will be presented with the job creation wizard. From here, you will be able to set the type of scan you wish to perform, change any settings, and select the Agent Groups you want included in the scanning process.

NOTE: If you create a new job and do not complete all of the steps, your progress will be saved as a draft, which you will be able to view from the Jobs page.
Step 1: Name and Time
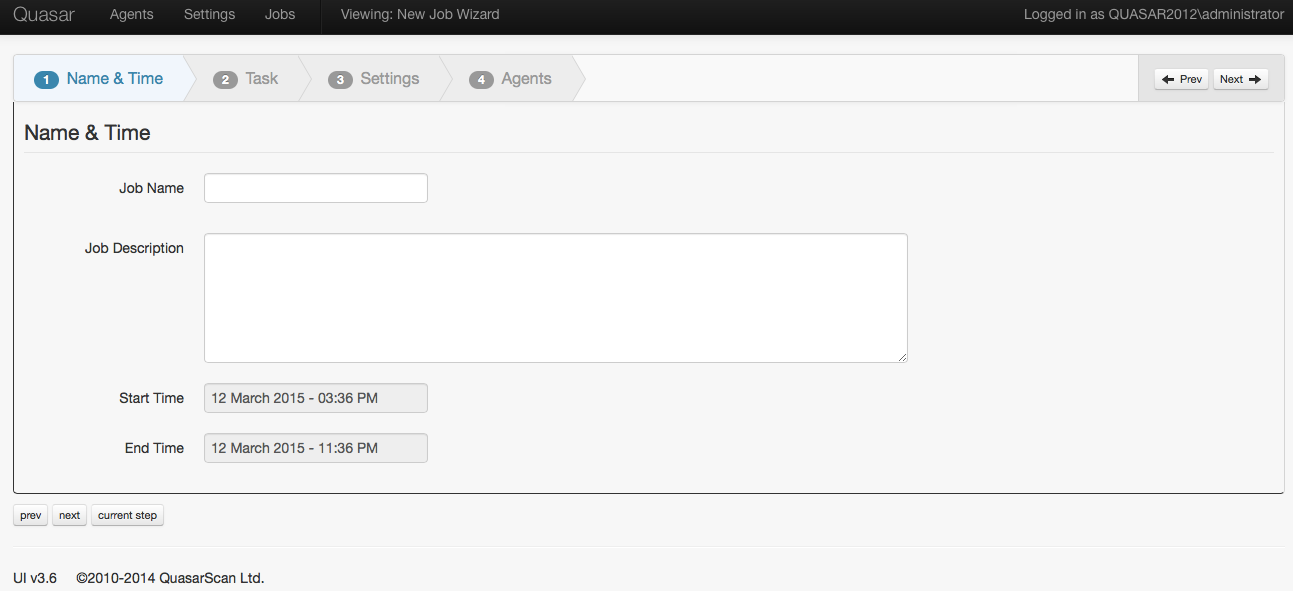
For each job you will need to enter a job name and a description, as well as a start time and an end time. Names must be unique.
NOTE: If you select an end date/time that is in the past, the job will be created, but the scan will not be completed and the status will show as STARTFAIL.
Once the Quasar Server receives the job information, it either pushes it immediately to the connected agents or hands it to non-connected agents when they connect and request the job information.
The agents themselves handle the scheduling, starting, and stopping of jobs (rather than the Quasar Server). By allowing the Agents to manage the jobs themselves:
- It makes for easier network configuration because the agents connect to the server.
- Remote Agents (for example, workers on mobile laptops) will still receive jobs as long as they connect to the server at some time during the job window.
- Although jobs may not start simultaneously, this setup provides greater flexibility for an environment where both mobile and local machines need scanning.
NOTE: The default start time is “Now” and the default end time is 8 hours later.
Once you have entered the name and job window information, click Next.
Step 2: Task
The next step is to select the task you want to perform.

CHD Scan Types
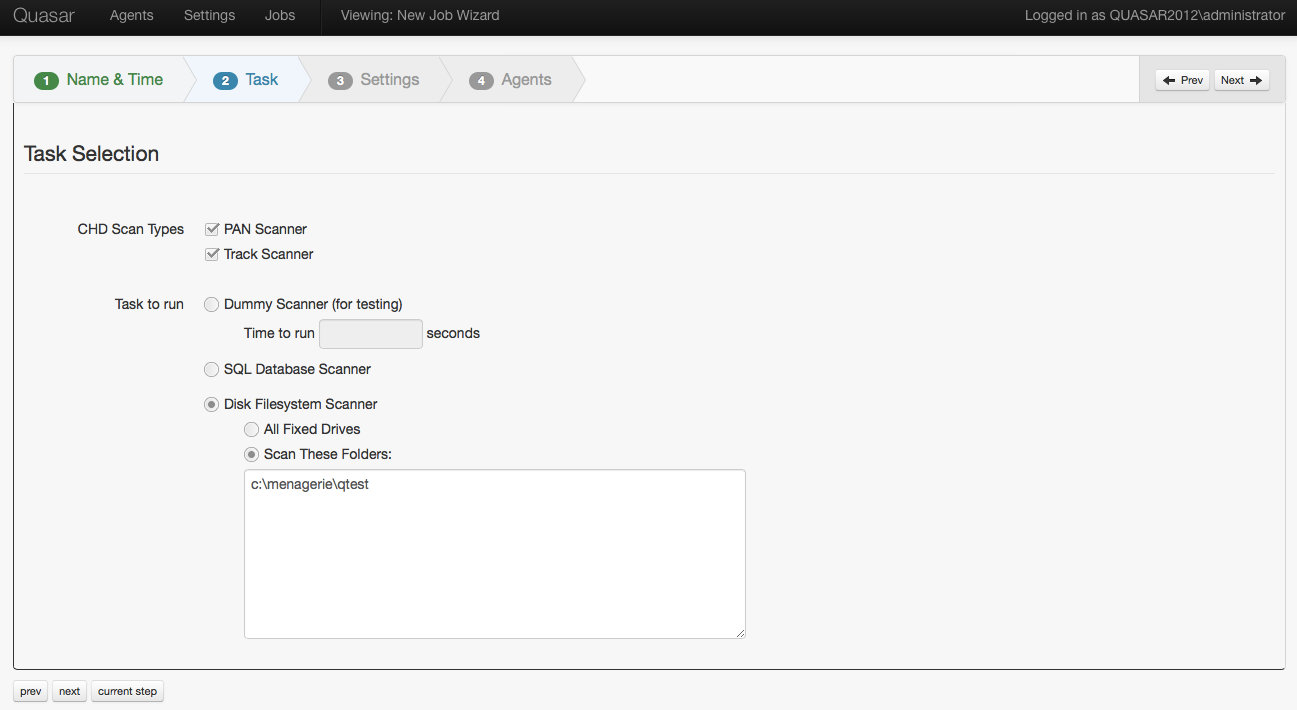
The Quasar agent can scan for both PAN data and Track Data (Track 1 and Track 2).
The recommended setting is to leave both boxes checked. However, if you wish to scan for only one or the other, uncheck the box that you do not wish to scan for. If you only need to scan for one or the the other, the scan time will be significantly faster.
Task to Run
There are three options for the type of scan to be completed.
Dummy Scanner (for testing)
This option will produce test data and will not scan any of your systems. This is useful if you want to conduct E2E testing, without conducting any actual scans.
SQL Database Scanner
Which databases to scan and where, are determined indirectly by which AgentGroups (and hence Agents) are selected for the scan.
This performs the same actions as the commandline, but the output will be written to the Files table, rather than printed to the console.
Additional information is available in the guide on setting-up Quasar to scan SQL Databases.
Disk Filesystem Scanner
This is the most common option for scanning. From here you can choose to scan All Fixed Drives or scan specific folders which can be typed in the box below Scan These Folders.
NOTE: When scanning Linux hosts, do NOT select All Fixed Drives if you wish to scan the entire filesystem – enter / into the Scan These Folders option instead.
If you opt to scan specific folders, enter one folder per line. Defining custom folders is key for custom installs.
The file list will be worked through sequentially.
Once you have entered, this information, click Next.
Step 3: Settings
On the settings screen, you can change specific settings for your scan. Detailed information on each of these settings is available in the Master Settings section of the user guide.

Once you have made any changes or if you are happy with the settings, click Next.
Step 4: Agents
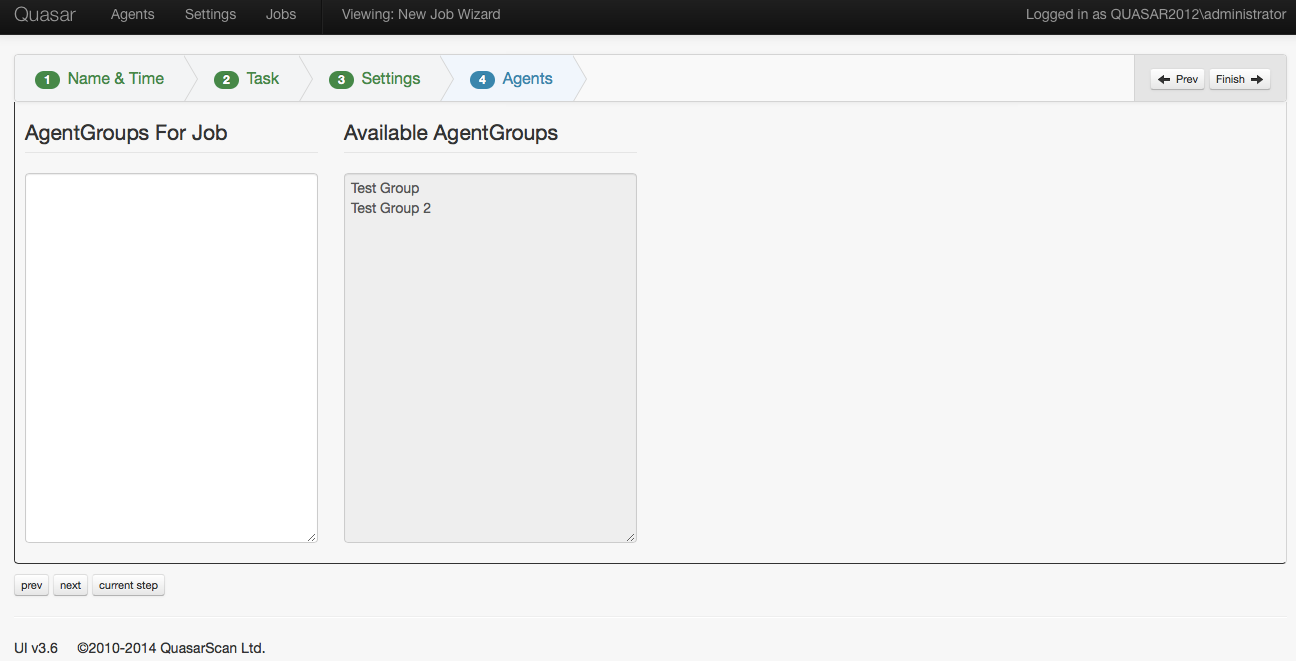
The final step before running the scan is to select the appropriate agent groups.

Just as with adding Agents to Agent Groups, Agent Groups can be copied and pasted from the Available AgentGroups box into the AgentGroups for Job box, or you can type them into the box.
NOTE: Only Agent Groups may be used, not individual Agents. However, it is possible to create an Agent Group that only contains a single Agent.
Once you have added all the Agent Group(s) to the AgentGroups for Job box, click Next and the job will be added to the queue.
Viewing the Status of Scans
Once a job is in progress, it is possible to view the progress of the scan.
To view the status of any job, click on the name of the job within the Jobs tab.
Jobs can be sorted by:
- Name
- Status (more information about Agent and Job Statuses is available in the user guide).
- Description
- Task
- Time Started
- Time Ended
- Agents
- Hits HI (the number of hits that are highly likely to contain cardholder data)
- Hits lo (the number of hits that are unlikely to contain cardholder data)
NOTE: You can sort each of the columns as ascending or descending. To sort by multiple columns, hold down the shift key as you click on each column you wish to sort by.
Select the job that you wish to view the status of by clicking its name. This will bring up the details for the scan.
Clicking on Active Agents in the sidebar for a job that is currently running will show you the progress for each Agent involved in the scan.

You can also view any inactive agents by clicking on Inactive Agents in the sidebar.
The Settings option in the sidebar will show you the current settings for the scan that were detailed in step 3 of creating a new job.
